Showing posts with label Hand-Eye Coordination. Show all posts

Sunday, 10 March 2013

Discovery Box - Easter

I got the original idea for this discovery box here, and it's the first of a few Easter themed activities I have planned for this year :-)

If you aren't familiar with the discovery box concept read my first post about it here.

The items included in this box were:

  • Plastic easter eggs - the kind that open up (Doller store or ebay less than $5)
  • Easter bunny and chick cabochons (Found on ebay for $5)
  • Coloured bells (Craft store $3)
  • Big coloured beads (Craft store $3)
  • Coloured plastic buttons (Doller store $2)
  • Pony beads - which I added last minute so not pictured (Craft store $5)
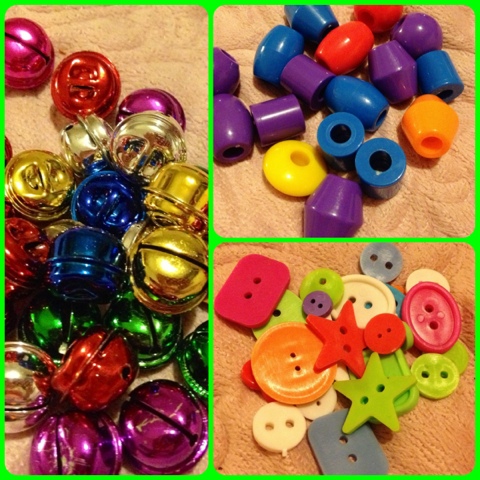
Of course you can really add in any small items that you have at home that are the right size to fit inside the eggs and make a variety of sounds. Most of the things I used (except the Easter bunnies/chicks) were things I already had on hand from previous projects.


One of the great things about discovery boxes is they are so freakin' simple to do! Just find a suitable size box/basket/container, gather some items, and throw them inside. Done.

I set the invitation up in the lounge room after Bean went to sleep, so she would find it first thing in the morning...


First she went through all the eggs, methodically opening and closing each one (that's my girl!)...


...Then she rummaged through the loose items, most of which she was familiar with - except for the chicks and bunnies! Cue "Ooooo!'s and "Ahhhhh!'s...


...After trying out putting them inside the eggs she gathered them all together on the table and began telling a story...


...after breakfast she revisited the box. Everything got tipped out on the floor, and the business of filling, shaking, and emptying began...


...This is fantatsic for developing hand-eye co-ordination, fine motor skills, sound differentiation, rhythm, and fun!...
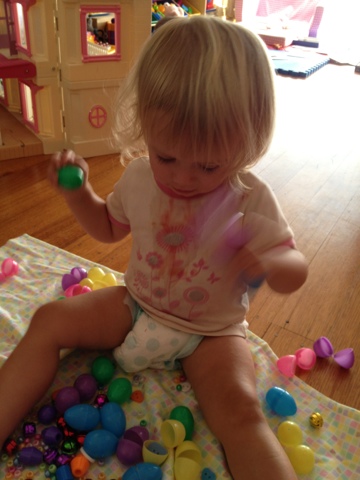

...I think this will be gracing our floor for a while!


Happy playing!

B xx


Monday, 12 November 2012

Discovery Box - Threading Practise For Little Hands

Lately I've been getting into the concept of 'Discovery Boxes', which is something I first did for Bean when she was about 6 months old and recently I was re-inspired by a post I saw over at The Imagination Tree, a blog i've only just discovered that is FULL of amazing play ideas!

The basic notion of the Discovery Box is a box that you fill with a selection of household, craft or natural objects that can be used in open ended play. The idea is that you let the child explore the box and its items in whatever way they chose, interfering as little as possible and allowing them to discover things for themselves, only offering suggestions or help if they struggle or run out of ideas. These boxes can be a great activity for a rainy day, or to occupy a busy baby or toddler for some time whilst you get something done.

This weeks box was something to extend Bean's current fascination with putting things 'In and Out' and 'Through'. Its perfect for practicing hand eye co-odination skills, without being too difficult for little hands to achieve success and satisfaction.

Here are the contents:


  • Colander
  • Large funnel
  • Grater
  • Strainer
  • Plastic cup with holes cut in sides
  • Plastic cup with foam stuck over top and holes cut in foam
  • Cardboard squares with holes cut out
  • Straws
  • Lollipop sticks
  • Pipe cleaners

When Bean woke up from her nap she toddled over to the box, which i had laid on the floor in the dining room. First she asked me to hold some of the cardboard squares whilst she threaded the pipe cleaners...

 
 Then she proceeded to try it herself with straws...


Then she got out the cup covered in foam...


And pretended to drink from the cup using the pipe cleaner as a straw (totally un-prompted)...


Then the colander took her interest, she liked to listen to the sound the pipe cleaners made as they went through the holes...


With the funnel she liked to see the straws disappear through the bottom and then look underneath to see where they'd gone...


She enjoyed putting the lollipop sticks through the cup with the holes in the sides...


I left the box out over the next few days and it was revisited several times. I noticed that it was a good way for Bean to self-regulate when she got over-excited or a bit manic towards the end of the day, doing a focused quiet activity like this really seems to help calm and center her...and it's so easy (and inexpensive) to do!


More discovery boxes to come soon....

B xx

Wednesday, 17 October 2012

Wordless Wednesday - Play Dough

I'm taking a cue from the Natural Parents Network and making Wednesday's wordless from now on! Just photos, no words. Like a story told purely in pictures for the reader to enjoy and interpret.
This week has involved a LOT of play dough...


B xx


Monday, 15 October 2012

Home Made Stamps

This is a creative (and easy!) alternative to buying rubber stamps, which can be expensive and also limited to the designs available. The potential for these is limited only by your imagination and the amount of bottle tops you can collect!

All you need is:


  • Foam scraps (ours were off cuts from foam stickers so already had sticky backing, but if yours don't just use white glue)
  • Scissors
  • Bottle tops
  • Paint
Originally i had planned to just buy foam stickers to make this even easier, but after searching for a few weeks i couldn't find any small enough to fit the bottle tops i'd saved. Then i found the foam sticker scraps at the craft shop for $3 a bag! Bargain!


All you do is cut out shapes from the foam to fit the size of the bottle tops, stick it on, and stamp away!


I also decided to buy a washable paint stamp pad from the craft shop for $4 to make this activity potentially less messy. However, once Bean gets the hang of it I'll just use poster paint on a plate for more color variation :-)

B xx


Friday, 12 October 2012

Sticky Pictures!


Today's activity was dead simple and so much fun! All you need is this....
  • Contact paper
  • Scissors
  • Masking tape
  • Assorted bits to make the picture (Coloured paper, wrapping paper, cellophane, Pom poms, magazine cut outs, ribbon, bows, feathers, etc)

Use the masking tape to stick it to a surface (we used the back of the dining room door) sticky side facing out...then start sticking!


When the picture is complete you can preserve it by sticking a second piece of contact paper to the sticky side, and you could even place of frame of colored paper or cardboard around the edge. Bean is still pretty much in the 'create and destroy' phase, so i didn't back this one! But we'll give that a go next time.

With Bean madly teething at the moment and the weather outside being less than inspiring, i've needed to come up with spontaneous activities fast! This one was a hit!

B xx

Sunday, 7 October 2012

Fun Enough To Eat

About 6 months ago or so I saw a post on Play At Home Mom about using water beads for sensory play:

http://playathomemom3.blogspot.com.au/2011/06/water-beads.html

It looked like great fun so I tried it a couple of times with Bean, who was about 11 months old at the time. Bean loved the water beads! But despite my best efforts and the very familiar refrain of 'That's not for your mouth', she just kept sneaking them in! And being a synthetic product I really didn't want those getting into her system. Needless to say, I lost patience with the whole thing and decided to wait until she was a bit older.

Then a little while ago I started contemplating giving the water beads another try...when Jake had a sudden flash of inspiration! He suggested using Tapioca Pearls instead, which are used in making bubble tea and easily purchased from asian grocers. These are almost exactly the same size and consistency as water beads but they're 100% edible! So we bought a couple of packs of the multicolored variety and today I finally got round to using them...


The only down side to these versus water beads is that they require a bit more preparation time. First you have to put them in water and bring to a boil on the stove...


Simmer for 5 minutes then scoop them out and allow to cool...


I found it was good to strain them through in a colander under cold running water a few times to help cool them, and also to remove the layer of goo that builds up during cooking. You can also add a bit of sugar or honey to them whilst they're cooling if you like, although I just left them as is this time round.


It takes about half an hour from start to finish, but totally worth the effort! So I set up this invitation for Bean whilst she was napping...


Since the pearls end up semi-translucent I chose to incorporate the light panel - but first I wrapped it in cling wrap to make for super easy clean up!

I put the pearls in a clear plastic container and set out various scooping implements with some other containers and an ice cube tray to fill up. When Bean woke up she dived straight in (still half asleep!)...


This is another great medium for scooping play (http://onelittlebean1.blogspot.com.au/2012/09/scooping-play.html)...


As well as being quite tasty...!


And it was also a great opportunity to practise some color sorting...


I left it set up and Bean revisited throughout the afternoon. Even Daddy got to join in when he got home from work! Definitely a success :-)


Enjoy!

Bxx

Thursday, 27 September 2012

Rainbow Rice

This is another fun and colorful medium to use for sensory play - rainbow rice! It's SO easy and quick to make, and Bean loves it. So here's the how to:


1. Take 5 cups of white rice and put inside a sandwich size zip lock bag.
2. Add 2 tablespoons of rubbing alcohol (Brand name 'Isocol' if your trying to find it in Australia).
3. Add 30 - 50 drops of food coloring. This is variable depending on how bright you want the colour to end up, I usually use about 40 or so drops.
4. Close the bag, squeezing out the air, and rub the contents around until the colour is evenly spread through.
5. Empty the rice out onto baking trays or baking paper to dry (overnight is best as it takes a few hours).


...and that's it! Easy peasy!

Rainbow rice has SO many uses. We generally use it either in a variety of bowels for scooping play, or in a clear tub on the light panel, but it would also make a great addition to a sensory table (which is on the Christmas list for Bean!). It can also be incorporated into arts and crafts, and would make a bright shaker in a clear tub or jar for little ones, and the list goes on!

Hope you're having a colorful day!

Bxx


Sunday, 16 September 2012

Light play

I first came across the concept of using a light panel for play on Play At Home Mom LLC, those ladies are the experts on this particular piece of equipment - i'm just spreading the word! So here's the original post I read:


Once I was convinced of the idea, I did some research on stockists in Australia, and found this one for the best price at Educational Experience:


It's definitely NOT a cheap purchase, but it is a truly versatile toy which lasts a child many years, and therefore I see it as a great investment in learning. So with the help of one of Bean's grandparents, we went ahead and bought one for her first birthday. A kind of unusual gift for a one year old perhaps, but 5 months on and it's one of the only toys we have that still gets used every day, often more than once a day (and now that Bean can, she regularly gets it out all by herself, which tells me that it's not only me who really enjoys it!).


 What I find so exciting about the light panel is the endless possibilities it has for play - there are SO many things you can use it for that it's really only limited by your imagination and creativity. In the beginning we used it mostly to enhance sensory play, such as the above photo of Bean exploring coloured rice...


...and coloured feathers from the craft store...


...and glass pebbles from the dollar shop.

Now Bean is a little older and more coordinated we've started doing things like building and stacking on the light panel:


The blocks pictured here are 'Rainbow Crystal Blocks' available online from Kangaroo Toys (http://www.hop.com.au/product?KEY_ITEM=WY2202&KEY_ALIAS=WY2202), and the little cups Bean is stacking are just transparent shot glasses bought at the dollar store. Bean has really taken to the stacking cups lately, and the other night we stumbled across a way to play peekaboo with them using a humble kitchen roll tube...


Here she has a long stack of cups in her hand and uses the tube to cover them up "Where are the cups?" I say....


"Ahhhhhh!" she exclaims pulling the tube off to reveal the stacked cups. So funny! 

Other things we've done so far with the light panel are....


...Shapes. Cut out from some lighting gels that I found on ebay for around $15 (which gets you a lot of them so I have many more shapes still to make)...


 ...Colours. Using colour paddles to demonstrate colour mixing, also available online from Kangaroo Toys (http://www.hop.com.au/product?KEY_ITEM=CT8157&KEY_ALIAS=CT8157)...


...and Magna Tiles, which I picked up on our recent trip to the US from Discount School Supply (these are also available in Australia from Kangaroo Toys, http://www.hop.com.au/product?KEY_ITEM=LS546&KEY_ALIAS=LS546, but unfortunately they're about twice the price as when you buy them from the US). Above we've used them for patterns....


...and here for building (although so far I do most of the construction, whilst Bean is mostly the demolition expert!).

There are heaps of other things I plan to try on the light panel in the coming months, such as painting with watercolours and exploring water beads, and of course as Bean grows and develops the list of activities for this toy only gets longer! So, if you can do it I highly recommend this as an educational and developmental toy...or maybe drop a hint to some helpful relatives around Christmas time! Just sayin' ;-)

B xx